When I first started creating cards at Greeting Card Universe a few months ago, one of the first Artists I noticed was Rosanne of Red Rose Digital Art. Her lovely signature rose caught my attention immediately and I have been a fan of her work since then. You can just imagine my delight when she accepted my invitation to do a guest post on my blog.
 | |
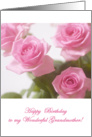
| Thank You, Rosanne! |
It’s a great image but is it a great greeting card?
First of all, a big thank you to Tracie Kaska of Photography TK Designs for the opportunity to contribute to her blog today. Tracie is a fine photographer and I am really enjoying the results of her 365-day photography challenge!
So, on with today’s post.
One of the most satisfying things you can do with an image is to share it with others. Sure, you can post it on the internet for others to see, but one of the best ways you can share an image is as a greeting card. I do this all the time. I make custom greeting cards from my photographic images for friends and family but, like Tracie, I also design greeting cards as a freelance artist with Greeting Card Universe.
You’d think that it would be easy to make a good photographic greeting card but it’s not just about dropping a random pretty image on to a sheet of paper and printing it out. There are a few things to think about and a few technical details to work out and then you’ll be ready to rumble.
1. Who am I designing this greeting card for?
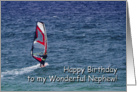
Is it for your grandmother? Is it for your nephew? Is it for a complete stranger to purchase and then send to a close friend? These are things that need to be thought about. After all, your grandmother might be partial to flowers, your nephew may love sports and the complete stranger may well love animals! When I set out to design a greeting card, I always think about the occasion and person the card will be for and then review my image portfolio carefully prior to making my final selection.

2. What size is a greeting card?
The easy answer to this is 5 inches by 7 inches (portrait) or 7 inches by 5 inches (landscape) at a 300 pixel per inch when folded in half. This is one of the most popular sizes for greeting cards. There are other sizes available but these are the precise dimensions of greeting cards at Greeting Card Universe and we use a template of 2100 pixels by 1500 pixels in order to get it right every time. Create one of these in your favourite image editing program and use it every time you create a greeting card.
3. Is my chosen image “greeting card” ready?
When I started with digital photography, my camera produced “massive” four megapixel images. These are small by today’s standards but a four megapixel image prints exceptionally well on a US Letter or A4 page. This is more than twice the size that you need to make an excellent greeting card. Fast forward eight years and my camera produces almost 18 megapixel images – even more to deal with! So one of the first things you will face is “Do I reduce the size of my image?” or “Do I make a creative crop of my image and use just a section of it?”
Today’s example: A creative crop.
In this example, I’m really talking about a crop! When I was in New Zealand a few years ago, I saw something quite surreal – 32 different mailboxes all in a row on the edge of a small housing estate. I leaped out of my car and snapped off six images to capture them all so I could use them as the foundation for a panorama – the only way to do justice to them all. I’ll talk more about shooting for panoramas in another post soon.

“Thirty Two Mailboxes” – © Red Rose Digital Art - Rosanne E. Casu.
As fun as this image is, it just does not translate in its entirety to a greeting card. However, a small portion of it certainly did:
Open your 2100 pixel by 1500 pixel template as well as your starting image in your image editing program. I use Adobe Photoshop CS5 but this should work with Photoshop Elements and Paint Shop Pro as well. Bring your source image to the front and then choose Layer > Duplicate Layer …. Duplicate your image and choose your template document as the destination.

As you can see, the image is much too big but that can easily be fixed by resizing the image while constraining the dimensions until its length is identical to the length of the template.

Then reposition the image until you are pleased with the composition and choose Image > Trim … to trim away the parts of the image that you no longer require.

Now it’s a cute picture but it’s still not quite ready to be a greeting card image yet.
When I looked at this image, I immediately thought of posting letters, saying hello and new neighbours. At that point, I thought that this image would be very appropriate for a “Welcome to the neighbourhood” greeting card which is precisely what I did with it. A cute “handwriting” font did the trick and I was done.

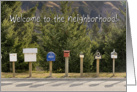
As you can see, a lovely image can be made into a great greeting card, but sometimes it just needs a little extra thought! Why not try and make a greeting card with the next image you really love?
If you enjoyed this post and the images presented here, please check out Rosanne’s main web site at http://www.redrosedigitalart.com/, her on-line photo gallery directly at http://redrosedigitalart.artistwebsites.com/ or her greeting cards at http://www.greetingcarduniverse.com/RedRoseDigitalArt. You can also find her on Facebook at http://www.facebook.com/RedRoseDigitalArt. Come and say “Hi”!
Thanks for the opportunity to post here today, Tracie!
ReplyDeleteCheers,
Rosanne
http://www.redrosedigitalart.com
Great post, I enjoyed reading it!
ReplyDeleteThanks Tracie and Sandra! Here's to all your beautiful photos that will turn into greeting cards and be sent out into the world. Much success and creative inspiration to you both! Sri
ReplyDeleteEnjoyed your guest post, Rosanne. Both of you ladies are very talented photographers!
ReplyDeleteRobin
Wonderful guest post Rosanne and Tracie!
ReplyDeleteLOVE the panorama, Rosanne! LOVE the card even more! Thanks for sharing your insights and the quick tutorial on making a beautiful card.
ReplyDeleteAnd thank you, too, Tracie for inviting her to guest blog. :)
Cindy
Great post, and thanks for sharing. I know I'll come back and read this one again.
ReplyDeleteReally nice post,Love the mailbox photo.
ReplyDeletehttp://www.greetingcarduniverse.com/dragonfiregraphics